Use the right cable or adapter, pick the projector input, then enable screen mirroring or extend.
I’ve spent years setting up projectors for meetings, classrooms, and homes. This guide explains how to connect laptop to projector with clear, tested steps. You’ll learn wired and wireless methods, how to choose cables and adapters, and quick fixes for common problems. Read on to save time and avoid the usual setup headaches.

What you need before connecting
Before you try to connect, gather a few items. Check your laptop ports and the projector’s inputs. Common ports include HDMI, USB-C, DisplayPort, and older VGA. Get a compatible cable or an adapter that converts between ports.
Keep these handy
- Laptop with working video output.
- Projector with power and input cables.
- Right cable or adapter for your ports.
- Remote or projector buttons to select input.
- Optional: extension cord, HDMI switch, or wireless dongle.
- Confirm the projector is powered on and warmed up.
- Make sure the laptop is charged or plugged in.
- Note the projector’s native resolution to set your laptop display later.
Source: youtube.com
Wired connections: step-by-step
Wired connections are the fastest and most reliable way to connect. I prefer HDMI when possible because it carries audio and video. Here are clear steps for each common wired method.
HDMI (most modern laptops and projectors)
- Turn off both devices if you can. This prevents weird handshake glitches.
- Plug the HDMI cable into the laptop HDMI port.
- Plug the other end into the projector HDMI input.
- Power both devices on. Select the HDMI input on the projector.
- On Windows press Windows + P and choose Duplicate or Extend. On macOS open System Preferences > Displays and click Detect Displays or Arrangement.
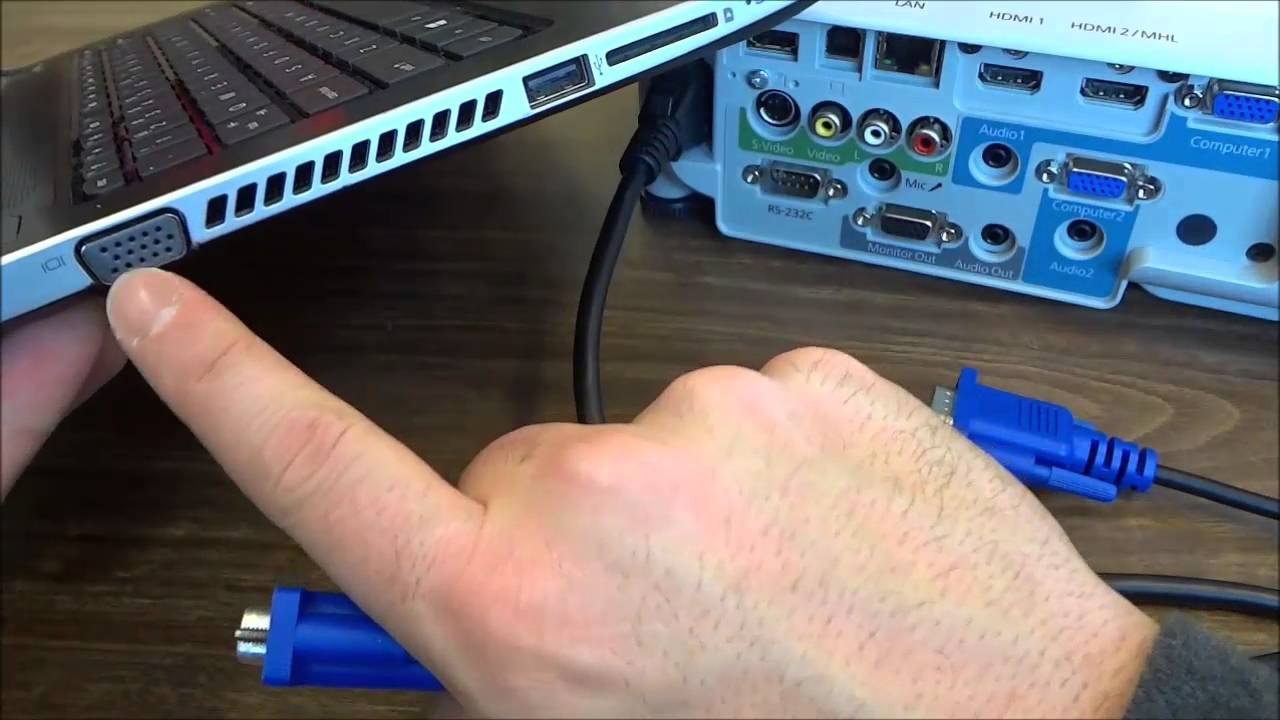
VGA (older projectors)
- Connect the VGA cable to laptop and projector.
- Attach a separate audio cable if you need sound.
- Select the VGA input on the projector and mirror or extend the display.
- VGA is analog. Expect lower image quality on high-resolution files.
USB-C or Thunderbolt (modern laptops)
- Use a USB-C to HDMI or USB-C to DisplayPort cable if the projector has those inputs.
- Plug into the laptop USB-C/Thunderbolt port and the projector input.
- Choose the projector input and set display options on the laptop.
DisplayPort and Mini DisplayPort
- Use the correct DisplayPort cable or an adapter to HDMI.
- Connect both ends, choose the projector input, and configure displays.
Adapters and converters
- Use active adapters for converting from USB-C or DisplayPort to VGA or HDMI with different signal types.
- Cheap passive adapters sometimes fail. Invest in a tested adapter.
Personal tip: I carry a small bag with an HDMI cable, USB-C to HDMI adapter, and a VGA adapter. It saves me when venues are unpredictable.

Source: youtube.com
Wireless connections: step-by-step
Wireless methods free you from cables. They work well for casual presentations and mobile use. Wireless setups vary by laptop OS and projector capability.
Chromecast (works from Chrome and many apps)
- Plug a Chromecast into the projector HDMI port and power it.
- Connect the laptop to the same Wi-Fi network.
- Use Chrome browser > Cast and pick the Chromecast device.
- Choose to cast a tab, the desktop, or a file.
Miracast (Windows and some Android devices)
- Ensure the projector supports Miracast or use a Miracast adapter.
- On Windows, press Windows + K and select the display device.
- Accept pairing on the projector if prompted.
- Miracast mirrors the screen over Wi-Fi Direct.
AirPlay (macOS and iOS)
- Use a projector that supports AirPlay or an Apple TV.
- On macOS, click the AirPlay icon in the menu bar and select the device.
- Choose to mirror or use the projector as a separate display.
Proprietary apps and projector Wi-Fi
- Some projectors have built-in apps for screen sharing. Install the app on your laptop or phone.
- Connect both devices to the projector’s Wi-Fi network and follow the app’s steps.
Wireless notes
- Wireless adds a small lag. Avoid it for fast video or gaming.
- Network congestion can cause drops. Use 5 GHz Wi-Fi when possible.
Source: meetingtomorrow.com
Troubleshooting common issues
Even simple setups can fail. Here are common problems and quick fixes I use when things go wrong.
No image on the projector
- Confirm projector input matches the cable port. Cycle inputs with the remote.
- Re-seat cables and try a different cable. Swap HDMI ports if available.
- Restart both devices after plugging cables in.
Laptop detects projector but shows black screen
- Use Windows + P to pick Duplicate or Extend.
- On macOS, open Displays and press Option to show Detect Displays.
- Lower the laptop resolution to match the projector’s native resolution.
Audio not playing through the projector
- HDMI carries audio, but you may need to switch output in sound settings.
- For VGA, use a separate 3.5mm cable or external speakers.
Fuzzy or low-quality image
- Check projector lens for dust and focus manually.
- Use a digital connection (HDMI or DisplayPort) for better sharpness.
- Set laptop resolution to match projector native resolution.
PAA-style question: Why isn’t my laptop recognizing the projector?
Short answer: Often the wrong input is selected or the cable is faulty. Reboot, try a known-good cable, and use the display detect feature on your OS.
PAA-style question: Can I connect my laptop to any projector?
Short answer: Most projectors can connect, but you may need adapters for port mismatches. Verify supported inputs before you buy adapters.

Source: wikihow.com
Choosing the right cables and adapters
Picking the right cable matters. Quality affects image, sound, and reliability.
Cable choices
- HDMI: Best for most modern setups. Carries audio and video.
- USB-C: Clean single-cable option for newer laptops (use USB-C to HDMI if needed).
- DisplayPort: Great for high-resolution and refresh rates.
- VGA: Legacy option. Use only if no digital option exists.
Adapter tips
- Buy active adapters when converting between digital and analog or when going from USB-C/DisplayPort to older ports.
- Check for PD (power delivery) on USB-C adapters if you want to charge the laptop through the same adapter.
- Choose braided cables and gold-plated connectors for better durability.
Personal note: I once used a passive USB-C adapter and lost video mid-presentation. An active adapter solved the issue and gave me peace of mind.

Source: youtube.com
Best practices and setup checklist
A quick checklist saves last-minute stress. Run this before your presentation.
Before the meeting
- Test the connection at least 10 minutes early.
- Have a backup cable and adapter in your bag.
- Save slides in multiple formats (PDF and PowerPoint).
- Set laptop power settings to prevent sleep or dimming.
During setup
- Turn on the projector and let it warm up.
- Connect cables, then power on the laptop. That order helps with detection.
- Choose Duplicate for simple mirroring or Extend to use two screens.
- Lock resolution to match the projector.
Room and safety
- Place the projector on a stable surface and use a cord cover for safety.
- Avoid blocking vents on the projector to reduce overheating.
- Dim the lights or close blinds for better image contrast.
Personal lesson: Arrive early. A 10-minute test has fixed more problems than any software update.

Source: franklincollege.edu
Frequently Asked Questions of how to connect laptop to projector
Why won’t my laptop display on the projector?
Check that the projector input matches the cable and that the cable is not damaged. Use the display detect option on your OS and try a different cable or port.
Can I use a single adapter for any laptop?
Not always. Many adapters are specific to port types. Prefer active adapters when converting between different signal types or when reliability matters.
How do I switch between mirror and extended display?
On Windows press Windows + P and choose Duplicate or Extend. On macOS go to System Preferences > Displays and use Arrangement to mirror or extend.
Will the projector play audio from my laptop?
HDMI carries audio automatically, but you may need to select the projector as the audio output in sound settings. VGA needs a separate audio cable.
Is wireless connection as good as wired?
Wireless is convenient but can introduce lag and occasional drops. Wired connections are more reliable for high-resolution video and critical presentations.
How do I match resolution with the projector?
Set your laptop to the projector’s native resolution in display settings. Lowering resolution can fix scaling issues and improve image clarity.
Conclusion
You now have a clear path for how to connect laptop to projector using wired and wireless methods. Gather the right cable, test ahead, and keep a backup adapter to avoid surprises. Take action: pack a small cable kit, run a quick test next time before a meeting, and share any setup tips you discover. If this guide helped, try it out today and leave a comment with your setup or a question.