Are you struggling how to add printer to MacBook? You’re not alone.
Setting up a printer might seem tricky, but it doesn’t have to be. Imagine being able to print your important documents or photos in just a few simple steps. In this guide, you’ll discover exactly how to add a printer to your MacBook quickly and easily.
Keep reading, and you’ll be printing like a pro in no time.
Check Printer Compatibility
Checking printer compatibility is a key step before connecting it to your MacBook. Not all printers work smoothly with macOS. Confirming compatibility saves time and avoids frustration.
MacBooks support many printers, but some need extra drivers or software. Knowing what your printer requires helps you prepare. It also ensures a seamless printing experience.
Identify Your MacBook’s macOS Version
Start by checking your MacBook’s macOS version. Click the Apple icon, then “About This Mac.” Note the version number shown. This version affects which printers will work without issues.
Newer macOS versions support many modern printers automatically. Older versions may need special drivers or software from the printer maker.
Check Printer Model And Manufacturer
Find the exact model name or number on your printer. Write down the manufacturer’s name too. This information helps you search for macOS compatibility.
Visit the manufacturer’s website for details. They often list which Mac versions their printers support. This step avoids buying a printer that won’t connect.
Look For Airprint Support
AirPrint is Apple’s built-in printing technology. Printers with AirPrint work easily with MacBooks without extra drivers. This makes setup fast and simple.
Check if your printer supports AirPrint. This is usually mentioned on the box or the company’s website. AirPrint support means fewer setup problems.
Review Required Printer Drivers
Some printers need drivers to communicate with your MacBook. Drivers are small software programs that help devices work together. Check if your printer needs drivers for macOS.
Get the latest drivers from the printer manufacturer’s site. Installing the correct driver ensures the printer works properly and offers full features.
Connect Printer To MacBook
Connecting a printer to your MacBook allows you to print documents, photos, and more quickly. The process can be simple and fast. There are two main ways to connect your printer to a MacBook: using a USB cable or through a Wi-Fi network. Each method has its benefits depending on your setup and printer type.
Using a USB Cable
Start by plugging the USB cable into your printer and your MacBook. The MacBook usually detects the printer automatically. A message may appear asking you to install the printer software. Follow the on-screen instructions to complete the installation.
Once installed, open System Preferences and select “Printers & Scanners.” The printer should be listed there. Select it and set it as your default printer for easier access. You can now print directly from your MacBook using the USB connection.
Using Wi-fi Network
Ensure your printer and MacBook are on the same Wi-Fi network. Turn on your printer and enable its wireless function. On your MacBook, open System Preferences and go to “Printers & Scanners.”
Click the plus (+) button to add a new printer. Your MacBook will search for printers on the network. Select your printer from the list and click “Add.” Your MacBook will connect to the printer wirelessly.
After adding, try printing a test page to confirm the connection. Wireless printing offers freedom to print from anywhere in your home or office. It also reduces cable clutter on your desk.
Add Printer Via System Preferences
Adding a printer to your MacBook via System Preferences is a straightforward process. This method works well for most printers, whether connected by USB or on the same Wi-Fi network. It allows your MacBook to recognize and communicate with the printer quickly.
Using System Preferences to add a printer helps keep your settings organized and easy to manage. The steps below guide you through adding a printer, so you can start printing without delays.
Open System Preferences
Start by clicking the Apple menu at the top left of the screen. Select “System Preferences” from the dropdown menu. This opens the settings panel where you can manage all your MacBook’s options.
Go To Printers & Scanners
In the System Preferences window, find and click on “Printers & Scanners.” This section controls all the printers connected to your MacBook. You will see a list of printers already added.
Click The Add (+) Button
At the bottom of the printer list, click the plus sign (+) to add a new printer. A new window will appear showing available printers nearby or connected through USB.
Select Your Printer
Look through the list for your printer’s name. Select it by clicking once. Your MacBook will prepare to add this printer and download any needed software automatically.
Confirm And Add Printer
After selecting your printer, click the “Add” button. The printer will then be added to your MacBook. It will appear in the Printers & Scanners list, ready for use.

Credit: www.youtube.com
Install Printer Drivers
Installing printer drivers is an important step to get your printer working with your MacBook. Drivers help your computer communicate with the printer. Without them, the printer may not work properly or at all.
MacBooks often install drivers automatically. Still, some printers need manual driver installation. This section shows how to install these drivers easily and quickly.
Identify Your Printer Model
Check the exact model number on your printer. It is usually on the front or back of the device. Knowing the model helps find the right driver for your MacBook.
Download Drivers From Manufacturer Website
Go to the printer maker’s official website. Search for your printer model in the support or downloads section. Download the Mac version of the driver software.
Run The Driver Installation File
Open the downloaded file on your MacBook. Follow the installation instructions on the screen. The process is simple and guided step-by-step.
Restart Your MacBook
After installation, restart your MacBook. This helps the system recognize the new printer driver. Your printer should be ready to use after reboot.
Troubleshoot Common Issues
Adding a printer to a MacBook usually goes smoothly. Still, some common problems might stop the printer from working. This section helps fix those issues fast. Follow these steps to get your printer working again.
Printer Not Showing Up
Check if the printer is turned on. Make sure it is connected to the same Wi-Fi network as your MacBook. Restart both your printer and MacBook. Open System Preferences and click on Printers & Scanners. See if your printer appears in the list. If not, click the plus (+) button to add it manually. Update your MacBook’s software and printer drivers to the latest version. Sometimes, resetting the printing system can help. Right-click in the Printers list and choose “Reset printing system.”
Print Jobs Not Starting
Look at the print queue for any stuck jobs. Open Printers & Scanners and select your printer. Click “Open Print Queue.” Cancel all jobs and try printing again. Check if your printer has enough paper and ink. Restart your printer and MacBook. Make sure no error lights blink on the printer. Sometimes, disconnecting and reconnecting the printer helps. Also, check your Wi-Fi connection for any interruptions.
Credit: computing.ch.cam.ac.uk
Credit: itss.d.umn.edu
Frequently Asked Questions
How Do I Connect A Printer To My MacBook Wirelessly?
Go to System Preferences, then Printers & Scanners. Click the plus (+) button and select your printer from the list. Make sure your printer and MacBook are on the same Wi-Fi network.
Can I Add A Usb Printer To My Macbook?
Yes, connect the printer to your MacBook using a USB cable. Your MacBook should recognize it automatically. If not, install the printer driver from the manufacturer’s website.
Why Won’t My Macbook Find My Printer?
Check if both devices are on the same network. Restart your printer and MacBook. Also, ensure the printer is turned on and connected properly.
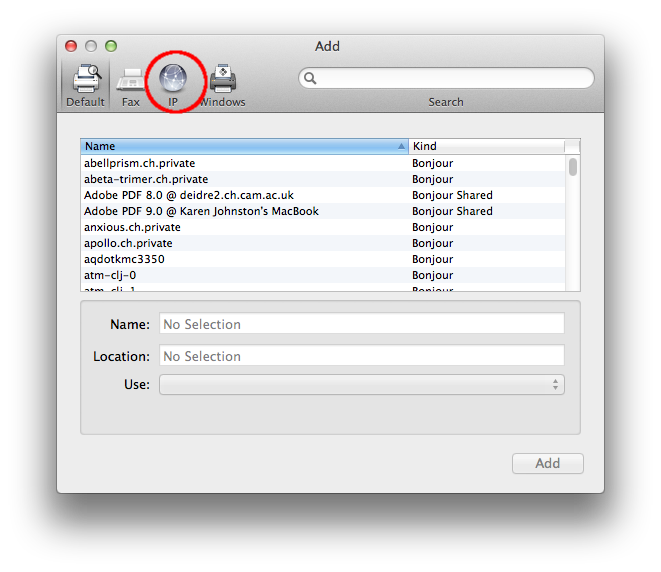
How Do I Add A Printer That Is Not Listed?
Click “Add Printer or Scanner” and then “IP” tab. Enter your printer’s IP address and choose the correct protocol. This connects your MacBook to printers not shown automatically.
Do I Need Special Software To Add A Printer to a Mac?
Most printers work with Mac’s built-in drivers. For some models, downloading software from the printer maker’s website is necessary. This helps access all printer features.
Conclusion
Adding a printer to your MacBook is simple and quick. Follow the steps carefully for the best results. Once connected, printing documents becomes easy and fast. No need to worry about complicated settings anymore. Enjoy the convenience of wireless or wired printing at home or work.
Keep your printer drivers updated for smooth performance. Now you can print photos, reports, and more with confidence. Printing from your MacBook just got easier.